
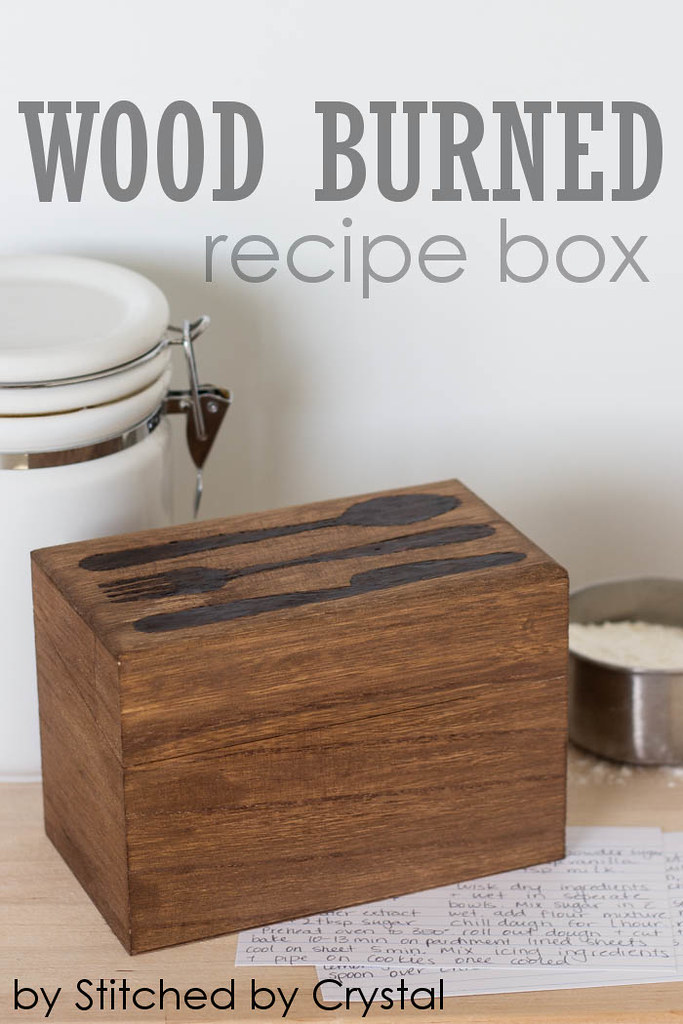
One of my goals this year was to get a little bit more organized with my meal planning. I have recipes everywhere, some in books, some on my computer, some on my tablet, it gets confusing and makes meal planning hard. So I decided to go old school with a recipe box, that way I can have all my recipes in one place and pull out the cards I want to use for the week. I picked up this little wooden box at Michael's on clearance for $2 and while I was there, I grabbed a wood burning tool too.

I decided on a knife, fork and spoon design for my box and sketched it out. Then I transferred my design to my box with some transfer paper and got to work burning my design into my box. I didn't bother practicing because I didn't have any spare wood on hand and the box only cost my a couple bucks anyways...How hard can it be right???
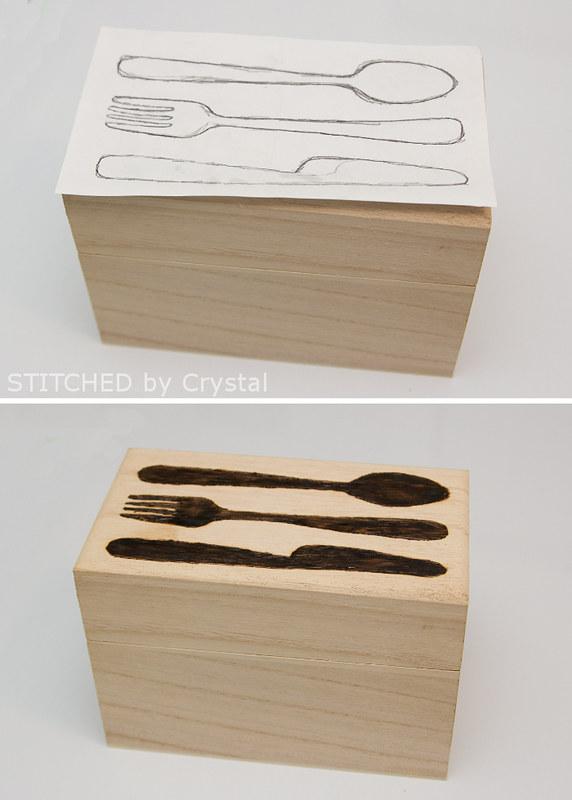
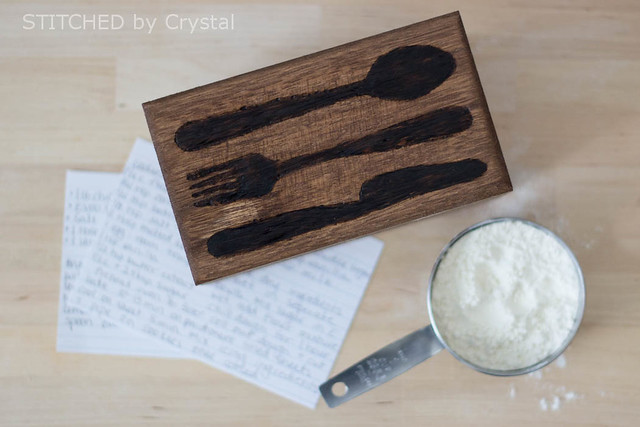
OK so it is not at easy as it looks :) My original plan was just the outline of the utensils on the box, but I had a hard time getting my lines to look the way I wanted so I ended up just filling everything in. When I was finished, it looked OK, but I still wasn't really happy with it. I used some dark wood stain to help hide my imperfections a bit and in the end I have a recipe box that I really love.
I learned a lot from this project and I am excited to try some more wood burning in the future. Here are a few things I learned from my first wood burning, I obviously still have a lot to learn but these tips may help you if you want to try wood burning for the first time too...
- Pick a nice soft wood. My box didn't cost much, and it really wasn't very good quality either. Even after I sanded it the wood was pretty rough and it has a really hard grain. I had a hard time drawing my lines the way I wanted because my wood burner tip just wanted to follow along the grain.
- Don't push too hard! I think this was my biggest beginner mistake. I was pushing on my wood burner tip a lot harder than I needed to and ended up with some really burned spots and some wonky lines. Once I lightened up a bit on the pressure, things went a lot smoother!
- Practice! OK, maybe this was really my biggest beginner mistake :) I jumped right into my first project without any practice at all. Grab some scrap wood and play around with different tips and also get the feel for how much pressure you need to use and how fast you need to go, the slower you move the wood burner, the darker your lines are.
- Keep a set of pliers and a glass bowl near by. This took me an embarrassingly long time to figure out. The wood burners come with several tips and you will probably want to change out your tip during your project. At first, I was turning the burner off and waiting for it to cool to change tips, then I had to wait for it to heat up again to get back to my project. Instead, use the pliers to unscrew the hot tip and place it in the glass bowl, then screw in the new tip and you are back in business!
- Pick a simple design. I picked something big and simple, with no letters for my first try, I think it was a pretty good choice!
Thanks for stopping by an reading about me trying my hand at wood burning! Swing by Swoodson Says to see the new craft she tried and check out the links below to see all the other bloggers who took on the new craft challenge!
See what other bloggers tried this month!
Rebecca at Hugs are Fun - Sashiko Embroidery
Kristy at Simply This Life - Knit Latvian Braid
Crystal at Stitched By Crystal - Wood Burning (hey, that's me!)
Vicky at Vicky Myers Creations - Using a Serger/Overlocker
Kelly at Just Another Project - Sewing with Piping

This turned out so cool, I love the stain with the woodburning. This is on my list to try for Spring... I bought the pen months and months ago and haven't opened it yet :(
ReplyDeleteYour recipe box turned out perfect! The staining added the antique look that I admire. I had a woodburning kit when I was a kid. This post is so inspiring!
ReplyDeleteYour first try at woodburning turned out great! This is something I have thought about trying for awhile but it makes me nervous because it can't be erased if I mess it up!
ReplyDeleteOoo, wood burning! This is totally on my to-do list. I love woodworking projects. I think yours turned out great!
ReplyDeleteAwesome post
ReplyDeleteOn the off chance that you've never utilized a wood lathe you should need to think about a pastime lathe.click here
ReplyDeleteSo how do you predict how much a board will move and in what direction? That depends on the grain direction, type of grain and time of year. In most areas, the relative humidity climbs as the weather turns warmer.Log Splitter Hub
ReplyDeleteone thing that i like about the blog could be that the information is very helpful and keeps one informed on issues related to politics. DEWALT Power Tool
ReplyDeleteYour board ought to be cleaned every now and again (and particularly in the wake of cutting any crude meat). discover this
ReplyDeleteFrom an ecological point of view softwood is less demanding to recharge than hardwood, setting aside less opportunity to develop to usable sizes and is developed in expansive woods around the globe. more Info
ReplyDeleteEnvision assembling a custom end table or pendulum clock and having it sit in your family room. It will be a theme of discussion at whatever point you have companions approached visit. They will ask: How did you make it? Where did you get the woodworking designs?CutTheWood.com - Woodworking DIY
ReplyDeleteAs no cement is commonly utilized, they don't should be pried up, gambling harm to the floor. flooring contractor in grants pass oregon
ReplyDeleteAdditionally, examine to ensure they're sufficiently high (most deck construction regulations require a 36-inch high railing and typically support 42-inch high railings) with rails not multiple inches separated (estimated beginning from within the rails). Ipe wood decking
ReplyDeleteSearch for simple to make extends that costs next to no to make. An undertaking that requires a ton of costly equipment or about six shades of costly paint will presumably not be truly beneficial. visit the website
ReplyDeletePresently in the event that you are only an amateur or a start-up specialist, at that point I emphatically propose you pick a wood plan that adheres to your ability level and strategy.Find Saw
ReplyDeleteThe table can stretch out on a cogwheel and tooth-track framework that changes the fence, which locks at the rails' finishes.
ReplyDeletenext page
It can help the worker to reduce the amount of labor and also increases the quality of work.navigate to this site
ReplyDeleteDry pounding makes a lot of residue. Proficient temporary workers control the residue with an elite vacuum framework. Chape
ReplyDeleteGreat idea . Its very simple but beautiful. I like this so much.Its made also easy . Just need a simple Tools . Everybody can do it easily. Thank you so much.
ReplyDeleteThank you so much for sharing this knowledgeable blog for us, it is truly a great informative site. That is very helpful for us. See here
ReplyDeleteThank you so much for sharing this knowledgeable blog for us, it is truly a great informative site. That is very helpful for us. chainsaw bar oil
ReplyDeleteIt was such a good post. Visit inset woodburning stove. Thanks for sharing.
ReplyDeleteWhat kind of wood did you use? What kind of tools did you use? How on earth did you make such a beautiful piece of furniture? As you discuss your work, a sense of pride will come over you and don't be surprised if your friends ask you to make one for them too!Viking , Wolf, Dacor Stove & Range Repair in REDLANDS
ReplyDeleteCleaning this sort of diligent substance off vinyl and PVC flooring requires utilizing the correct kind of instruments to achieve this without harming the floor all the while. Flooring contractors
ReplyDeleteThe other bonuses that come with this package include a series of premium woodworking videos, a how to guide on how to start a woodworking business, and a woodworking carpentry guide, which teaches you lots of useful secretes and tips that the really skilled carpenters know.Buy wooden diwan for home online in India
ReplyDeleteOnce you find where the houses and trails were located, bingo, you may just found the jackpot. how-to-start-a-woodworking-business.s3.amazonaws.com
ReplyDeleteSo now let's take a look at the Four Level Floating Wall Shelf. This shelf will truly make an artful statement in your home. patio wood wall
ReplyDeleteYou watch out for not get this degree of determination with industrial facility guitars, so in spite of the fact that they can sound unique in relation to one another, the distinctions are a result of incident instead of guileful choice. Vietnam Wood factories
ReplyDeleteWood can be used to make necklaces, rings, bracelets, earrings and other jewelry and you don't need to be an expert at wood working to do it. The biggest secret to making wooden jewelry is knowing what type of materials to use and which tools are best for optimal results. singapore pallet truck
ReplyDeleteI am so grateful for your blog post. Really thank you! Cool.reach truck singapore
ReplyDeleteThanks for the article. Much thanks again. Keep writing.pallet truck
ReplyDeleteEdit Picture Online is a professional Clipping Path Service Provider, delivering high-quality image editing solutions for e-commerce, photographers, and businesses. Our expert team specializes in precise background removal, image masking, ghost mannequin effects, and color correction to enhance visual appeal. With fast, affordable, and reliable services, we ensure flawless image editing tailored to your needs. Try our services today!
ReplyDeleteHi there, I read your blogs regularly. Thank You for Providing Such Unique and valuable information.
ReplyDeleteComplete your hajj registration with Obokash.com, a trusted agency specializing in Hajj and Umrah packages. We ensure a smooth and hassle-free registration process, providing all necessary guidance and support. Start your sacred journey today with our expert services and dedicated customer care.
Looking to Remove wrinkles from clothes in your product photos? Our skilled editors use advanced tools like the Healing Brush and Clone Stamp in Photoshop to smooth out garments flawlessly. Perfect for online stores and fashion shoots, this service improves photo quality and ensures your clothes look fresh, neat, and professional.
ReplyDelete