
Showing posts with label Toddler. Show all posts

May 15, 2013

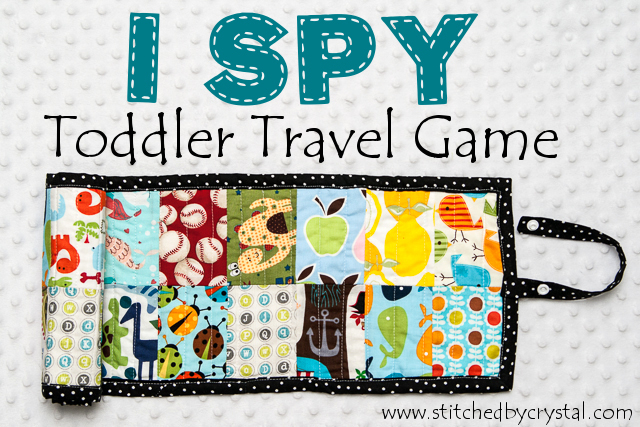
Tutorial: "I Spy" Toddler Travel Game


One of my favorite ways to keep my toddler busy when we are out is to have him look for things.  When he starts to get a little restless I will say things like "can you find something blue?" or "look for some flowers" and he will quietly look around until he finds what I asked for.  This game works great in places with lots of stuff like a restaurant or grocery store, but not so great in other places.  I mean, how many times can your two year old find the coffee pot while you wait on your oil change before he decides mom's game is not so fun?


So I came up with this little game.  It is just a tiny little quilt made with some fabric scraps, but it can roll up and fit in the diaper bag and provide hours of entertainment!


For little toddlers, like mine, you ask them things like "can you find an apple?" or "point to a dinosaur?".  When they are a bit bigger, you can work on color recognition with questions like "can you find something red?"  If you use fabric with numbers or letters on it you can even work on letter or number recognition.  If your kids are spelling, you could try things like "where is something that starts with the letter L" or "find something that rhymes with rug".  Even older kids could have fun with this playing the traditional "I spy" game.


To make the game, you need:
  • 44 rectangles of fabric that are 3" wide x 4" tall with different objects on them (22 for the front and 22 for the back)
  • a rectangle of batting 28" x 8 "
  • a little over 2 yards of bias tape or binding
  • one rectangle of fabric 2" wide x 10" long 
  • a snap or velcro

Sew your rectangles into 4 rows of 11. Two row are for the front and two are for the back.  Press the seams of the two rows in opposite directions.


Sew the two front rows together.  Repeat with the two rows for the back.


Sandwich the batting between the rows and quilt some rows about 1" apart across the whole thing.


Fold the 10" by 2" strip in half and sew the long end and one short end.


Turn the strip right side out and press it.  Baste the raw edge to one of the short ends of the game.


Bind the raw edges or sew on bias tape.  Click HERE for help with binding.


Add one end of the snap or velcro to the end of the strap you sewed on.  


Roll up the game and wrap the strap around it.  Mark the position the other end of the snap or velcro should go then add it to the strap.


Roll up your game and throw it in your diaper bag.  You will be happy to have it next time your toddler gets bored!


Aug 30, 2012

Tutorial: Easy Kid Shorts


Elastic waist kids shorts and pants are SO easy to sew.  Sometimes I wonder why I buy them from the store at all.
I made this pair of shorts for my son to match his sisters seersucker sun suit for our trip to the beach.  


This tutorial will show you how to make a pattern from a pair of shorts (or you could use the same technique on pants) and sew a simple pair of elastic waist shorts.  You can do this for any size, even use it to make some elastic waist PJ pants for yourself!
These shorts are comfortable for your little and easy to get on and off (an important feature in pants for a wiggly toddler.)  You can make them in any fabric, seersucker makes them perfect for the beach!


To make some shorts you will need:
Fabric - you can use anything, I like a lighter weight cotton because it is cool and comfy.  The amount of fabric you need will depend on the size shorts you are making, I used less than 1/2 a yard on these and he wears 18-24 month clothes.
Elastic - I used 1" elastic and again, the length will depend on the size of your kid.

To start you need to make a pattern.  Find a pair of shorts that fit your kiddo pretty well.
Turn them inside out and fold them in half. Pull the crotch seam out and get them as flat as you can, like in the picture below.


Find a big piece of paper to draw your pattern on, I buy wrapping on sale after Christmas to draw patterns on.  Trace around the shorts.  If your shorts have an elastic waist, you will want to stretch it out when you trace it, you mat have to enlist some help for that so someone can keep it stretched while you trace. When you are tracing, you want to add a little extra at the top for the waistband and a little extra at the bottom for the hem, you also want an extra 1/4" or so on the side for the seam allowance.  This picture below shows the outline on my shorts and where I added a little extra.  You can just add it to the pattern while you are tracing.


You will notice that the crotch piece is bigger in the back than in the front and the waist is a bit lower in the front.  You will want to trace one side and then fold them the other way to trace the other side.  


Fold your fabric right sides together and use your pattern to cut out your front pieces and back pieces.  You should end up with two of each.


With the right sides together, pin the two back pieces together along the curve and sew them together.  Finish the edge with a serger or zigzag stitch.  Then press the seam.  Repeat with the front pieces.


Line up the front and back pieces and sew along the side.  Finish the edges and press the seams.


Line up the inseam of the front and back, sew, finish the edges, and press the seams.


Decide how long you want your shorts.  You can do this by using the shorts you made your pattern from or by trying them on your kid. 
Trim the legs leaving enough room for your hem.  You can even leave a little extra and let the hem out as your kid grows!
Serge the edges.  If you don't have a serger, you can just fold the edge up a 1/4" and iron it.
Fold the bottom up towards the inside of the pants and press.  Pin then and sew the hem.


I sew one row of stitches then moved my shorts 1/4" over and sewed another row to give my shorts a more finished look.


Next serge the edge of the fabric at the top of the pants or fold it down 1/4" and press it.  Then fold the edge down to make the casing for your elastic.  You want the fold to be about 1/4" bigger then your elastic is wide, my elastic is 1" so I folded down 1 1/4".


Sew along the edge leaving an opening about 2" in the back of the pants to feed the elastic in.


Measure your child's waist and cut a piece of elastic the 1" longer than the measurement.  
Use a safety pin to help feed the elastic through the waist.  Make sure you hold on to the other end so it doesn't get lost inside.  


Overlap the ends of elastic 1" and sew them together with a zig zag stitch.


Pull the waistband taught so the elastic all slips inside the casing.  If you have a label pin it in the waistband.  I always use some kind of tag when I make pants, even if it is just a piece of folded ribbon, that way I know which side it the back.
Sew the opening closed.


And you are done!


Now you have a pair of shorts perfect for shell hunting!

Aug 15, 2012

Toddler backpack

I have been working on a little backpack for my son.


He isn't in school yet so he doesn't really need a backpack.  But he likes dragging bags around the house to put stuff in and then pull back out, so I figured he would enjoy one.

He has been wearing it around the house and filling it with whatever random things he finds... crayons, trucks, blocks, keys, drink coasters, TV remotes... anything that will fit!


I finished the bag a few days ago, then the next day I took it apart and put it back together again...twice.

I wanted it to be sturdy so it would hold it's shape so I used duck cloth to line it.  That stuff is heavy!  So I ended up taking it apart and removing the duck cloth in some places where I didn't really need it so the bag would be lighter.

The outer fabric is Monkey's Bizness by Alexander Henry.


I used a heavy duty plastic zipper so it is easier for little hands to open.


I put in some one on the front, two inside, and little pockets on the sides, perfect for Murray to tag along!


It has adjustable straps so it will grow with him for a while.


This little bag will be going on our trip in a couple of weeks.  I am planning to fill it with lots of goodies for him can carry on the plane.  I am totally picturing this cute little guy walking through the airport with his backpack on....


But I know he would really be running at top toddler speed with me chasing after him.  So instead he will be strapped in to his stroller with the bag stowed underneath!  

Aug 7, 2012

Quiet Book: Let's Bake Cookies!

I finished pages 2 and 3 of my quiet book!  (You can see page one here).


These pages will help my son learn shapes, he will get to practice matching shapes, and have some fun pretend play too!

He can roll out the dough with the rolling pin.


The cookies are all attached with Velcro.


Then the cookies go on the baking sheet to bake.  I put plastic netting inside the spatula so make it a bit sturdier, Andrew can use it to get the hot cookies off the baking sheet.


After the cookies bake, they can get iced.  The icing comes with sprinkles already on it, if only decorating real cookies was this easy!


The icing shapes get matched to the cookie shapes and Velcro on.


Then you can enjoy some cookies with your friends! The leftovers can get stored away in the cookie jar.

Aug 3, 2012

Quiet Book: Three Little Speckled Frogs


This is my newest craft project, a quiet book for my son.  I have been thinking about making one for sometime now, I think he will really enjoy it. 

We are planning a plane trip next month, all the way across the country so my kids can meet my grandparents.  The thought of flying for several hours with a 21 month old and a 2 month old makes me very nervous.  I am hoping this book will keep A occupied some!  Also, it is a good thing I started it a month in advance because it is a bit more time consuming than I thought it would be, this could take me all month!


It is all sewn by hand which I don't do very often but am really enjoying.  It is nice to be able to sew where ever I want instead of being stuck in the back room all by my self, most of this was sewn while watching the summer Olympics :)  

This is my first time trying hand embroidery and I have been kind of making it up as I go along.  I have a ton of respect for those crafters who do all that stunning hand embroidery, this stuff is hard!


This first page was inspired by children's song "Five little speckled frogs" only I just have three frogs :) 


LinkWithin

Related Posts Plugin for WordPress, Blogger...
I love reading all of your comments! Please make sure your blogger profile is linked to your email, so I can respond to your questions via email, otherwise I won't be able to email you back!

Please feel free to email me(stitchedbycrystal@gmail.com).

Thank you so much for reading! I If you like what you have seen here make sure become a follower of my blog so you can catch all my updates!!