Showing posts with label Halloween. Show all posts

Oct 20, 2015

Halloween 2015 - Woody and Jessie

It is Halloween costume time!  I have said this several times before, but I will say it again, costume sewing is my favorite! And I think my kids like it most when I sew them costumes too :)

They have been planning for at least 6 months now what costumes they would choose for Halloween.  Em was pretty set on Minnie Mouse, and she was going to wear this dress I made her for her birthday.  A was going back and forth a lot, but had pretty well settled on Captain America.  Then with a last minute change of heart, they decided to go as Woody and Jessie from Toy Story.


I was pretty thrilled with them picking coordinating costumes.  Seriously...how cute are these two!


And of course since they coordinated, I have to get the whole family in on it!  My husband isn't crazy about costumes, but I have him talked into to dressing up as Buzz Lightyear (but just a t-shirt and some wings, nothing too crazy) and I am working on a Mrs. Potato Head costume for me.


Let me tell you about their costumes! I made everything except the hats and boots.  The boots I picked up at Walmart, super cheap. And I found this Woody hat and this Jessie hat on Amazon (affiliate links).  The hat came with white string on it, but I swapped it out for some brown sting I bought at Hobby Lobby so it looks a bit more like Woody's hat.


Then for their pants, I bought the lightweight denim and cow print at JoAnn Fabrics and used I modified the Small Fry Skinnies pattern by Titchy Threads (same pants I sewed HERE).  I modified the pants to have an elastic back waist and faux fly, but kept all the great jeans details like the pockets, yoke, and topstitching.  For Jessie's pants, I made them more of a boot cut than a skinny pant and sewed the chaps right into the front of the jeans.  Then I added some 1" white ribbons to the side seams for the fringe.

They also each got brown vinyl belts and felt belt buckles.  The belts close with D rings and the buckle is glued on top.  For the belt buckle detail, I sketched out my design then free motion stitched it onto 2 layers of felt.  In hindsight, I think I should have added some king of stabilizer between the layers of felt.


Woody also got a vinyl holster with some felt details on it.


For Jessie's shirt, I used the Classic Oxford pattern by Peek-a-boo patterns (which I made once a couple years ago).  I added the front yoke detailing and changed the shape of the yoke a bit in the back,  I used some polyester trim for the red yoke detail and sewed it on with a zig zag stitch.  And I added some red piping below the yokes.  I also lengthened the sleeves and modified the cuff a bit to it could be turned up and flare out a bit.  The cuffs got the same polyester trim details.  The shirt closes with snaps that are hidden in the hem allowance and I added two big decorative buttons.


Woody's shirt is also made with the Classic Oxford pattern by Peek-a-boo patterns.  I couldn't find the perfect fabric, so I bought some plain yellow and drew the red checks on with red fabric marker.  I drafted a pattern for the vest and sewed it up with the same cow print I used for Jessie's chaps,  Then I trimmed it with some striped bias tape, Hobby Lobby had the perfect tiny stripe fabric to make the bias trim.  I used the same free motion technique I used for the belt buckles to make his Sheriff badge and stitched that to the vest.


I spent a several days trying to convince my kids that Em would be a really great blonde Jessie, but they both insisted she needed red hair.  So I made her a red yarn wig.  I had some red nylon left over from last years superman costume that I used to make a tight fitting cap.  Then I stitched some red yard right down the middle in the front and some straight across the back.  I pulled the hair back to a braid and added Jessie's yellow bow.  This was my first time making a wig, and it has a few bald spots, but the get covered by the hat!


Phew! And there you have it! One Woody and one Jessie!  I had so much fun making these costumes, and seeing my kids get excited about them too make it so worth the effort!


I think these are my favorite costumes yet! How will I ever top these next year?!

Oct 12, 2015

Little Bandit Costume

Are your kids Halloween costumes trick-or-treat ready or are you still looking for costume ideas?  I am just putting the finishing touches on my kids costumes and will hopefully be sharing some pictures of them soon!  In the meantime, I have a really quick easy costume idea that you can throw together and it is something that will work for boys or girls of any age!


This little bandit costume is half handmade and half store bought.  I made the hat, mask, money bag, and striped shirt (but you could buy the shirt too!) and added some black shoes and pants.  And the best part is it is really quick to make and cheap too!


My daughter has different plans for her Halloween costume this year, but she has been having a blast playing dress up with this costume and sneaking around the house.  Wouldn't this make for a really fun game of cops and robbers?!


You can find all the details on this costume and how to make the hat, mask, and money bag over at Make it & Love it today!

Sep 8, 2015

Easy Parrot Costume

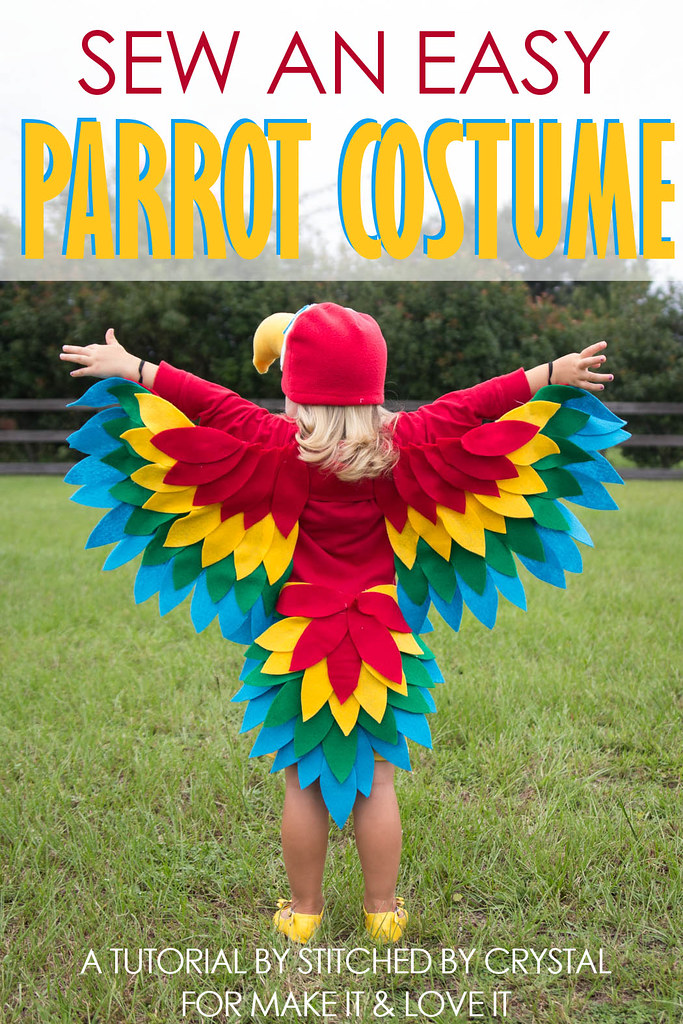
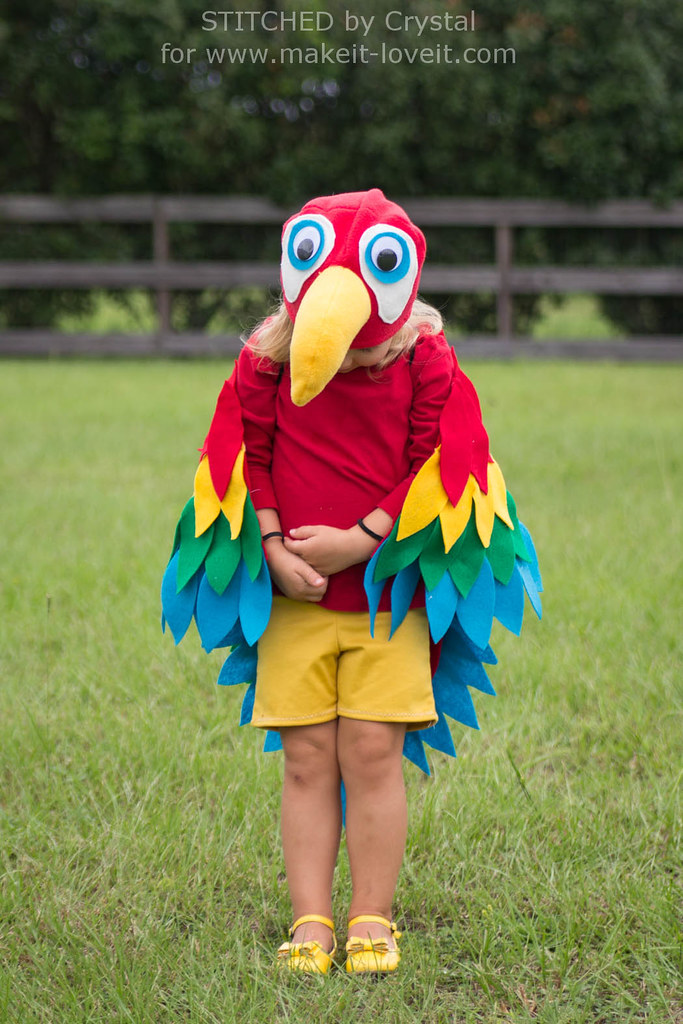
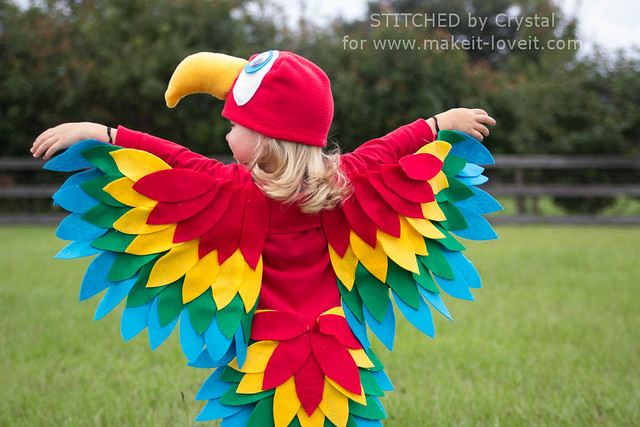
Looking for some Halloween costume inspiration? I am over at Make it & Love it today sharing a fun and simple parrot costume!


The costume is felt wings and a felt tail with a fleece hat.  It is easy to sew, a great project for beginners!  And could be easily adapted by changing the feather colors to make just about any bird your little one wants to be!


You can find the full tutorial for the parrot costume HERE!

Sep 1, 2015

Tutorial - Superman Costume

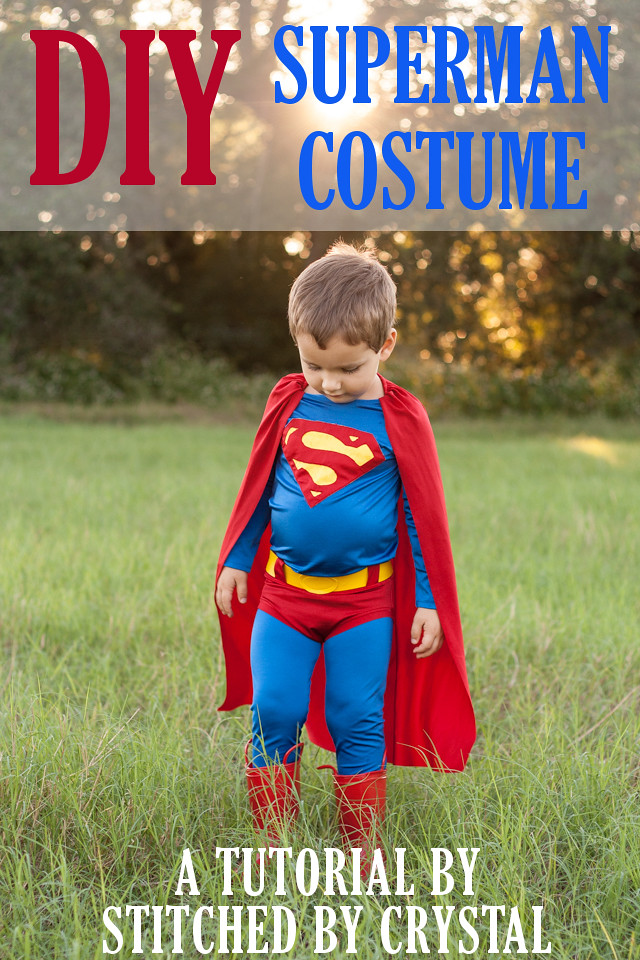
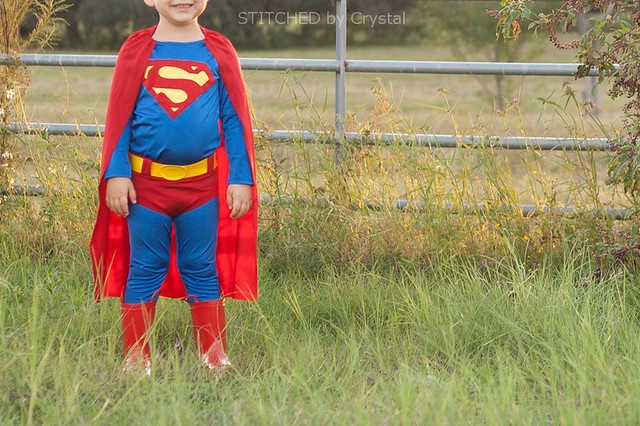
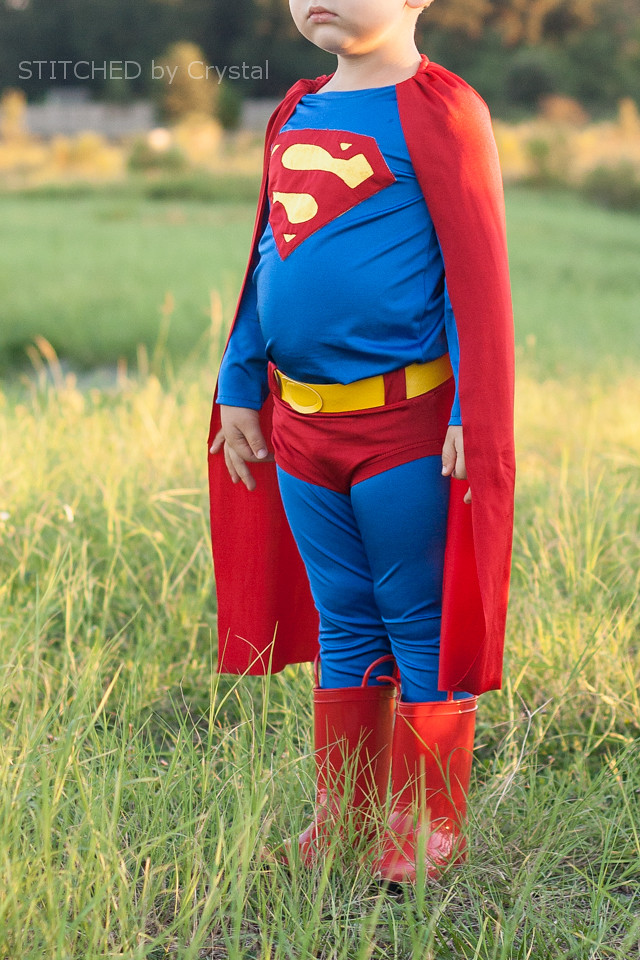
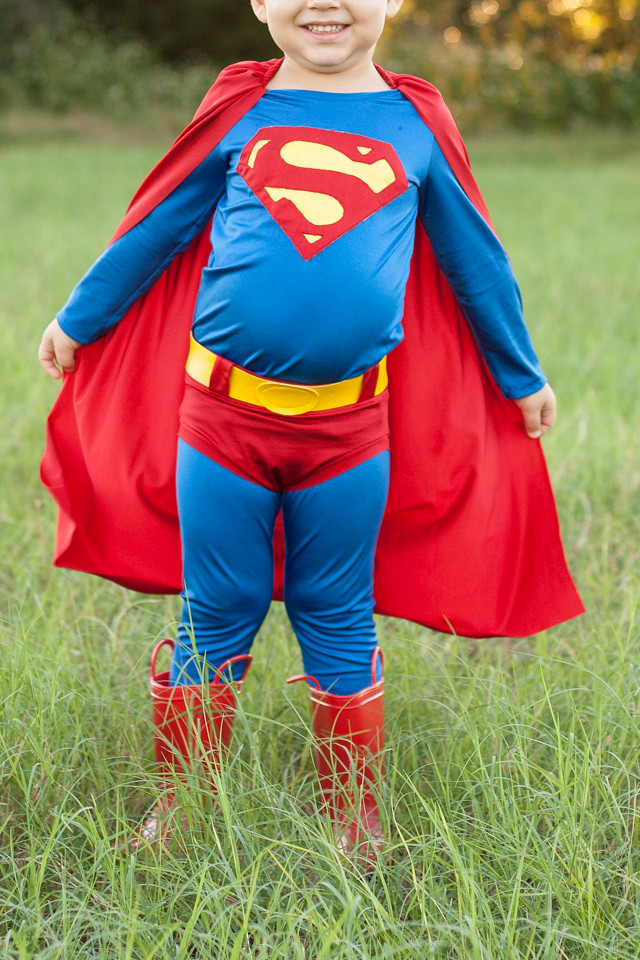
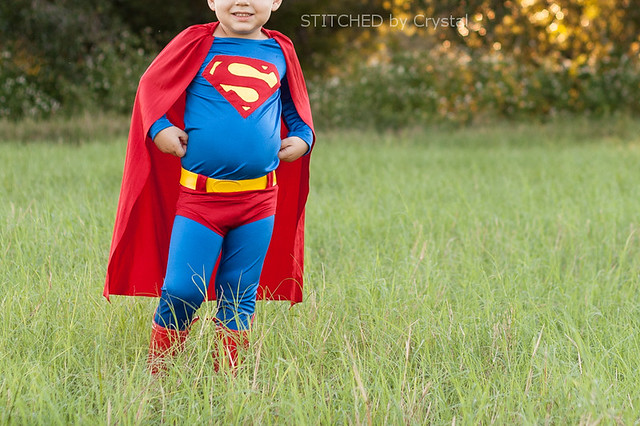
I have another overdue tutorial to share today! Although, with Halloween coming up, maybe this tutorial and last weeks fireman coat tutorial are really right on time :) This was A's Superman costume from last year, probably one of my favorite things I have ever made! And his too. This costume still fits, well I should say he can still squeeze into it, and it gets worn around the house at least once a week. What little boy wouldn't want to dress like Superman every week?


The costume is really simple, leggings, shirt, undies, belt, and cape. It is all made out of nylon/lycra swimsuit material (with the exception of the belt) so it is pretty forgiving in size, my son has grown a lot in the past year and he is still wearing this same costume!


To make my costume, I used several patterns, all from Jocole...the basic brief bottoms, the basic knit leggings, and the classic knit tee. But any leggings, shirt, and undies pattern will work, or you can trace clothing your child already owns and make your own patterns.


So...let me show you how I made my Superman! Let's start with the shirt, it is probably the trickiest. 


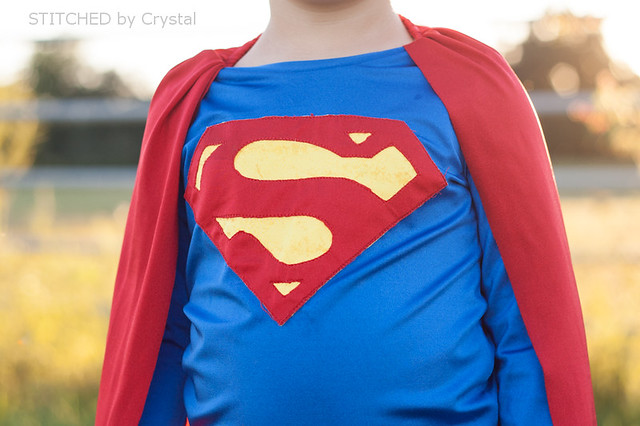
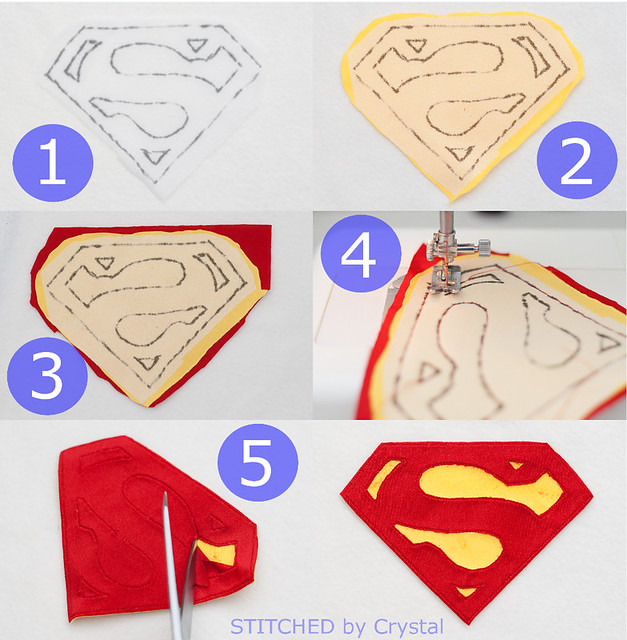
Cut out all your pattern pieces from blue lycra fabric, but before sewing the shirt, you will want to add your S applique. To add the applique, follow the steps below.
  1. Draw the “S” on the glue side of the interfacing. You can sketch one out or print one and put it behind the interfacing and trace it.
  2. Iron the interfacing to the wrong side of some yellow lycra
  3. Then place some red lycra on top of the yellow, I used a basting spray you can find in the quilting section of your fabric store to keep the fabric in place.
  4. With red thread in your sewing machine, sew around the “S” you drew on the interfacing.
  5. Carefully separate trim the red lycra away from the background, leaving just the yellow showing behind the “S”.
  6. Trim around the diamond shape.
  7. Pin the “S” in place on the shirt front and sew around the edge to keep it in place.
  8. Sew up your shirt according to the pattern instructions.

Now for the Super briefs!


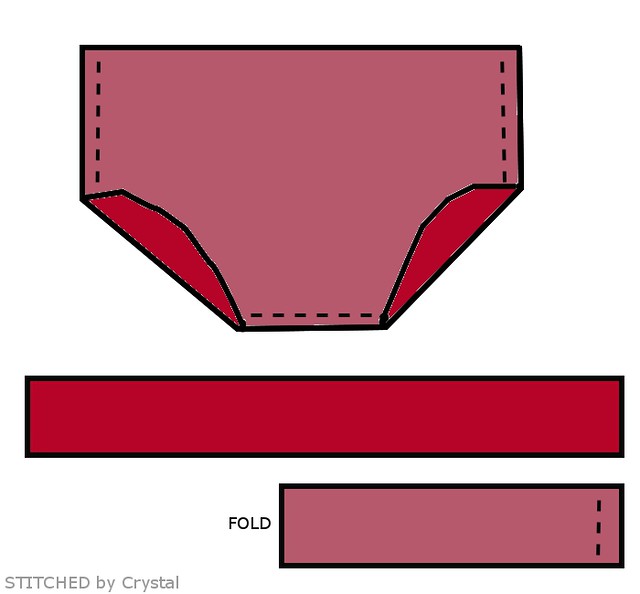
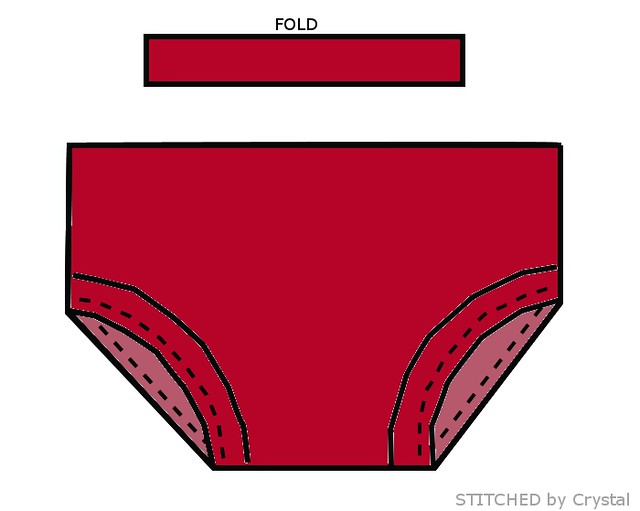
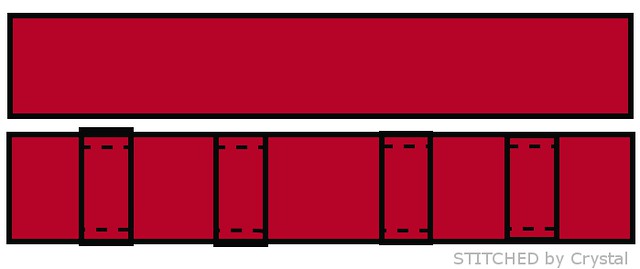
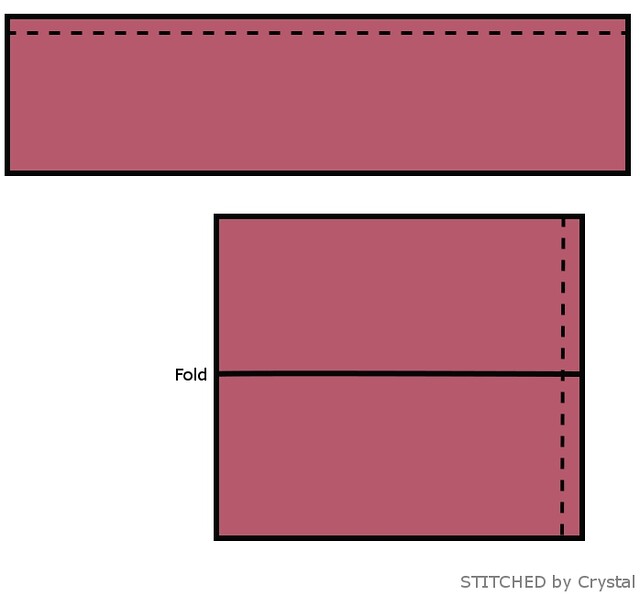
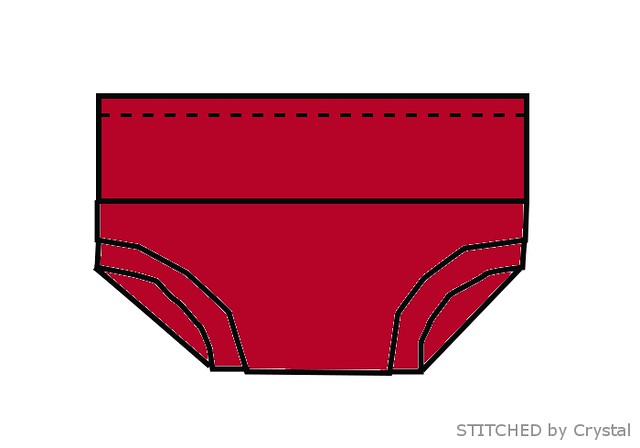
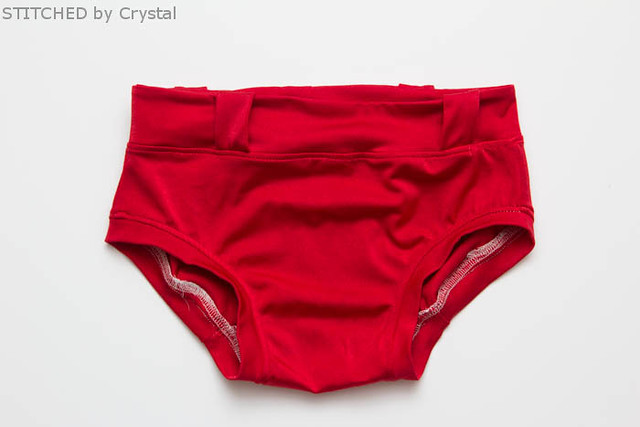
I took photos of how I made these last year, but I have misplaced them...so instead you get some rough computer sketches :) For these, I sized up and I trimmed a bit of the leg and waist to make room for my bindings.

I sewed the front and back of the briefs together and instead of elastic on the legs and waist, I added some bindings. I measured the leg holes and cut binding strips that were the length of the opening and 2" wide. I sewed the short ends together to form a loop.


I folded the binding in half, wrong sides together. Then I sewed the binding to the right side of my briefs flipped it down and topstitched along the seam.


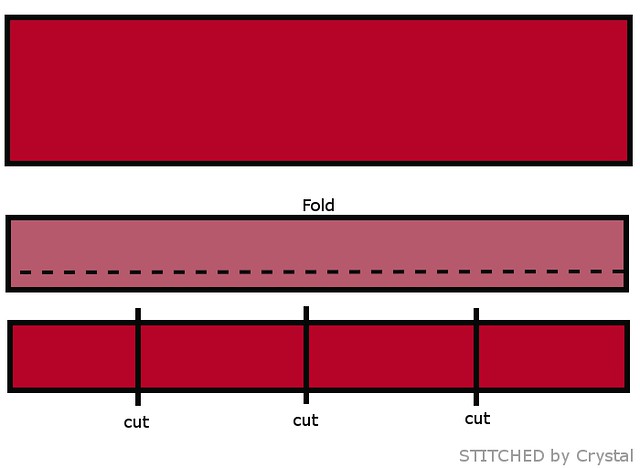
For the waistband, I made some belt loops. I started with a strip 2" x 8", folded it and sewed along one long edge. Then I turned it right side out and cut it into 4 belt loops.


I measured the waist opening and cut 2 waistband pieces the length of the opening measurement and 2" wide. I sewed the belt loops to one of my waistband pieces.


I placed the 2 waist band pieces right sides together and sewed along the top edge. Then I opened them up and folded them the other way and sewed along the edge to make a loop.


I turned the waistband right side out, folded it in half and sewed it to the top of the briefs.


Then I flipped the waist band up an topstitched.


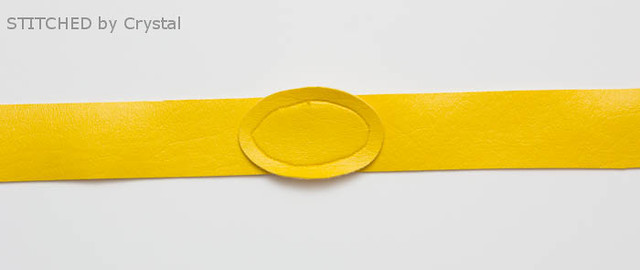
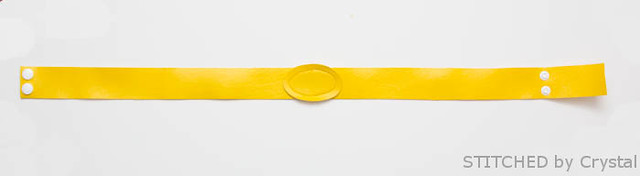
The belt is made of some yellow pleather I found in the upholstery fabrics. I cut a belt 1.25" wide x 25" long. I cut an oval an topstitched it in the center of the belt. I tried the belt on my son and marked the placement for some snaps to close it in the back (you could use velcro instead) 


The pants are simple, just plain old leggings in blue lycra.

And finally, the cape!


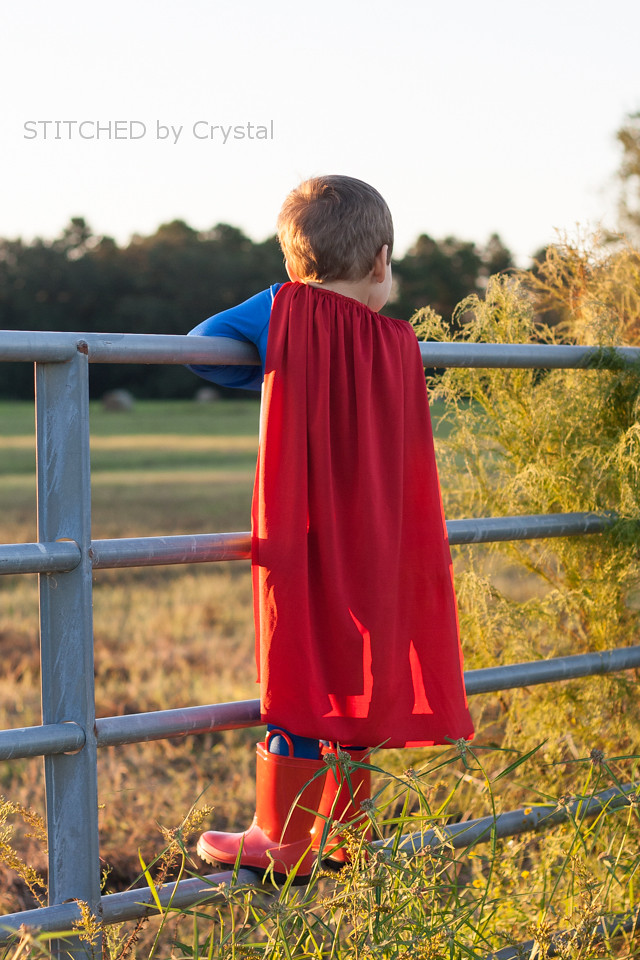
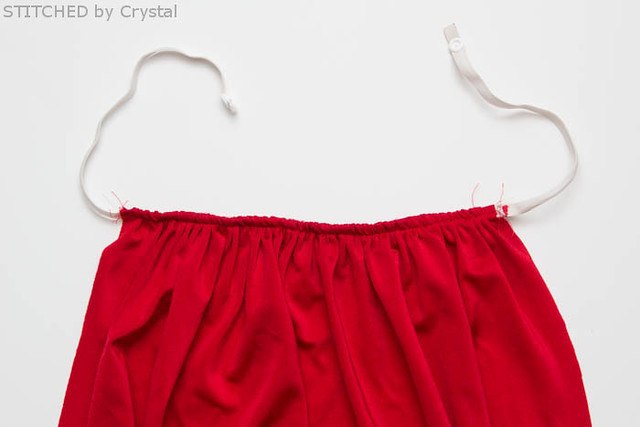
The cape is just a rectangle of lycra, I used 30" long by 27" wide for my 3.5 year old, gathered at the top and sewn to a piece of 3/8" elastic.

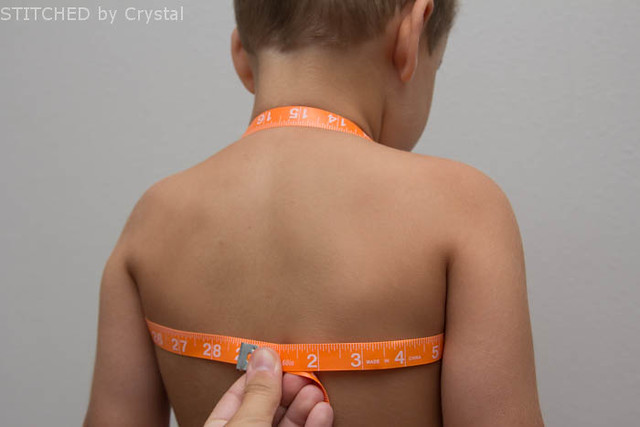
Measure how much elastic you need for your child, the elastic is worn across the top of the shoulders behind the neck, then goes in front of the shoulders and under the arms, it connects behind the back. You don't want the elastic too tight that it rubs in the armpits, I used about 30" for my son.


Gather the top of the cape and sew it to the middle of the elastic. Then flip the elastic towards the wrong side of the cape and topstitch to create a finished look. I added a snap to connect the ends of my elastic. Because the cape does not go around the neck there is no risk for strangulation and you could simply sew the ends together. The elastic goes under the shirt so I like the snap for easy cape removal, without it you have to take the shirt off to get the cape off.


To put the costume on, put the cape on first, then put the shirt over it and pull the cape out the top of the shirt.  


You can find even more Halloween ideas and inspiration HERE!

Aug 26, 2015

Tutorial - Fireman Coat

Halloween is just a little over two months away!  Are you making Halloween costumes this year Of all the sewing I do, Halloween sewing is my favorite, so I love this time of the year.  My kids are still deciding what they want to be this year, it changes every week!  So while they work on deciding this years costumes, I figured I would throw back to Halloween two years ago.  

Remember A's fireman costume?  I shared the tutorial for the pants HERE and the tutorial for the coat has been over at Pattern Revolution.  But I wanted to post it here too. If you missed the costume two years ago, you can catch it now, with some updated pictures...same old costume, different kid.  


This costume has seen a lot of wear in the last two years, it is a favorite from the dress up box.  My son was not quite 3 when he wore this costume.  I had made the coat a bit big so he could get some extra pretend play out of the costume, and at 4 and a half years old it fits him great.  The pants not so much, but he still squeezes into them! He has requested a new pair of pants, so that has been added to the "to sew" list, I should probably sew up a second coat too, Em loves this costume just as much as he does!


I used duct tape on the coat instead of reflective tape.  I couldn't find the reflective tape locally so I improvised.  Are wondering how duct tape on fabric holds up after two years? (I was a bit curious about how it would wear when I made it) Turns out, it holds up great!  This has even been through the washing machine several times, I haven't put it in the dryer, I always hang or lay flat to dry.  


Alright, on to the tutorial!  For this coat, I used plain cotton fabric, a tan color for the outside (similar to the color our local firemen wear) and a black for the lining and silver and yellow duct tape for the reflective stripes.  I used the Puddle Jumper Coat Pattern by Peek-A-Boo Patterns as my base for the coat and I chose a size up.


I cut out all the pieces according to the pattern but I skipped the hood and hood binding. 

Next, I added my reflective tape (AKA duct tape).  I started with the cuffs.  I folded the cuffs in half and put a piece of yellow tape about 1/2" from the fold.  Then I cut a piece of silver so it was 3/4" wide and put that in the middle.  I found it was easiest to stick the tape on my self healing mat and use my rotary cutter to cut it, it doesn't stick to the mat well so it was easy to get up. 


Next I flipped the cuff over and put tape on the other side too.  I knew I would be rolling the sleeves since I was making a size big and wanted the tape to show with the sleeves rolled, but also show when he grows and they aren't rolled.  So I ended up with two rows of tape about 1" apart on both cuff pieces. 


Then I repeated the process with the bottom band piece.  I folded it in half and placed my tape about 1/2" from the fold. 


To add the tape to the jacket, I started with the sleeves and put the tape about 1" above the corner where the armpit will be.  Then I added it to both front pieces and the back piece, making sure it  was even with the tape on the sleeves. 


I sewed all the edges of the duct tape down.  Sewing the tape was not as tricky as I thought it might be.  It did gum up my needle a bit, I wiped it down with rubbing alcohol occasionally while I was sewing and then changed my needle when I was done. 


I added the pockets to the front pieces of the coat according to the pattern instructions.  I made the flaps over the pockets by cutting two rectangles that were as wide as my pocket pieces and 4" long (for the 4/5 size coat they were 6" x 4").  I folded the rectangles and sewed around the edges, leaving a small opening on the top for turning.  I turned, pressed and top-stitched the flaps over the pockets with the folded edge at the bottom and the hole at the top so it would get closed up when I top stitched. 


I sewed the jacket pieces and lining pieces according to the pattern. Be careful when you are sewing that you do not iron your duct tape!  If you need to iron anywhere there is duct tape use a pressing cloth and low heat or the duct tape will melt. Once I had the outer coat and lining done but not sewn together, I made my collar.  I measured the length of the neck opening of the jacket. 


I cut two rectangles for my collar 1" smaller then the opening and 3" wide (22" x 3" for size 4/5).  Iron interfacing to one of the rectangle then sew along three sides, leaving one long side open.  Clip the corners, turn the collar right side out and press.  Top stitch along the 3 finished edges. Find the middle of the collar and the center back of the coat.  Pin the collar to the right side of the coat, starting in the middle and working out.  Baste the collar to the coat. 


Attach the lining, finish the sleeves and add the snaps according to the pattern.  


There you have it! One adorable firefighter costume!  You can find the bunker pants tutorial HERE.  And you can get some more costume inspiration HERE!


LinkWithin

Related Posts Plugin for WordPress, Blogger...
I love reading all of your comments! Please make sure your blogger profile is linked to your email, so I can respond to your questions via email, otherwise I won't be able to email you back!

Please feel free to email me(stitchedbycrystal@gmail.com).

Thank you so much for reading! I If you like what you have seen here make sure become a follower of my blog so you can catch all my updates!!