
Isn’t there always room in your closet for one more bag?
I love making bags; they are easy, quick and useful too! And I make a lot of them, like this grocery bag, this beach bag, or this leather clutch. I made this bag a few months ago and shared it over at SNAP. Today I am sharing it here with you!

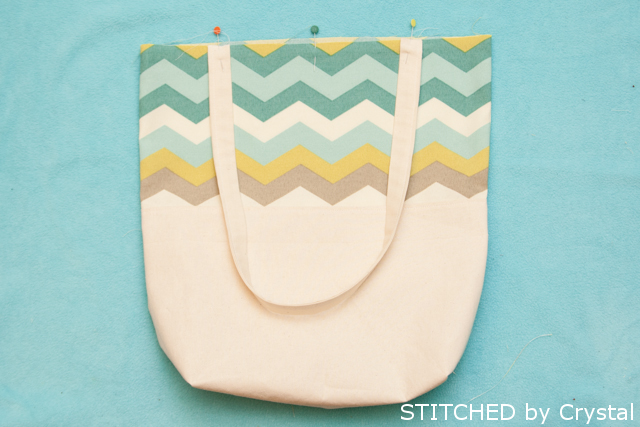
This color block tote measures about 16 inches x 16 inches. I added a little pocket on the inside to keep me keys and phone in so they are easy to find.

This bag is perfect for the beach or pool this summer, or would be great just for running around town too.

Wnat to make one? Let’s make a bag!
For durability, this bag should be made out thicker fabric, something like canvas, twill, duck cloth, or corduroy. Try looking in your fabric store’s home décor, apparel, or utility fabric sections for something you like that has some weight to it.
You will need:
- 2/3 yard of the fabric you will use for the bottom of the bag and the straps
- 1/4 yard of the fabric you will use for the top of the bag
- Some double fold bias tape if you want to add a pocket.
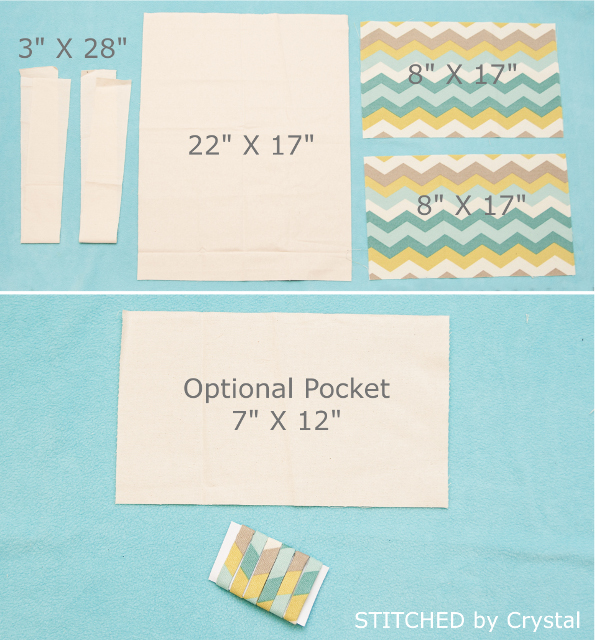
From the 2/3 yard, cut one 22 inch x 17 inch rectangle and two 3 inch x 28 inch rectangles.
From the 1/4 yard, cut two 8 inch x 17 inch rectangles.
For the optional pocket, cut one 7 inch x 12 inch rectangle
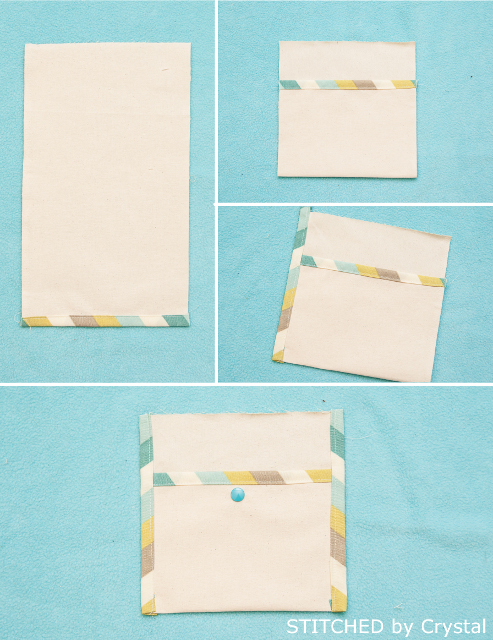
To make the pocket, enclose one of the 7 inch edges of your pocket piece inside some bias tape and sew it in place. Fold that end up about 5 inches and sew two more strips of bias tape on the sides to cover the raw edges. If you want, you can add a snap to keep everything inside the pocket. Set your pocket aside.
Next, prepare your straps. Folding the edges in 1/4 inch then fold the strap in half and sew along the edge to close the opening. Set the straps aside.

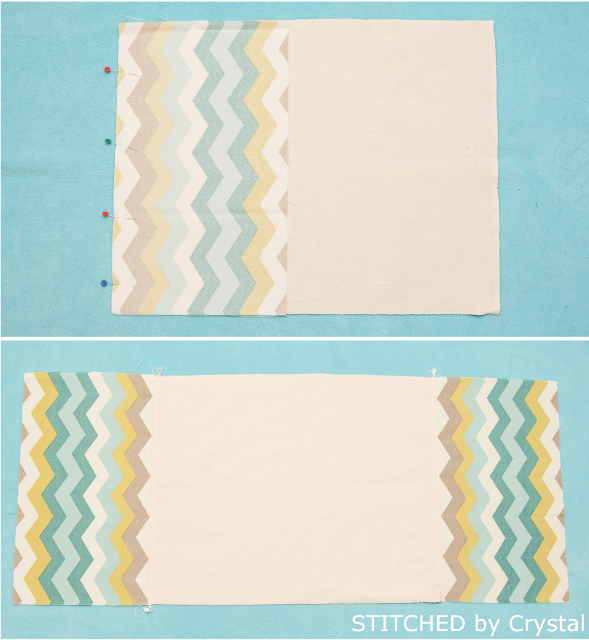
Line up one of the 17 inch sides of the bottom bag piece and one of the top pieces with the right sides together. Sew along the edge with ½ inch seam allowance. Finish the edge with a serger or zig zag stitch on your sewing machine. Press the seam up and top stitch. Repeat those steps to sew the other top piece on the other side. You should now have one long rectangle with the bottom piece sandwiched between the top pieces.
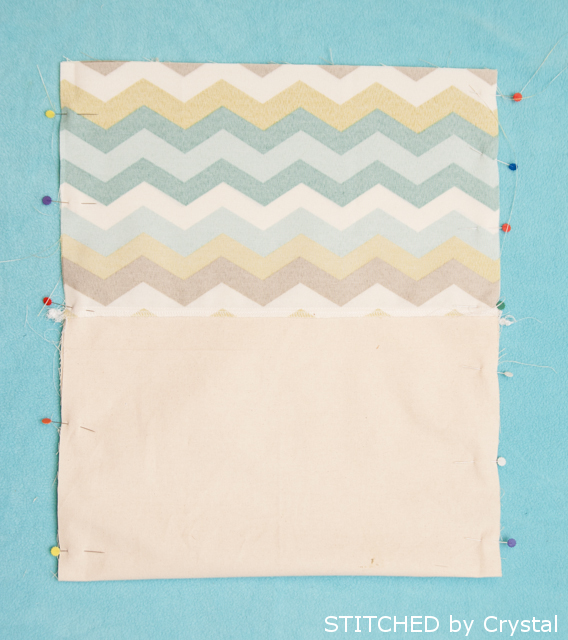
Fold the bag in half and pin, lining up the seams where the top fabric meets the bottom fabric. Sew the side seams and finish the seams with a serger or zig zag stitch.
Create gussets at the bottom by measuring 2 inches over from the side seam and 2 inches up from the bottom and cutting a square out of the bottom corners. Pull the fabric apart so the raw edges line up and sew across the gusset with ½ inch seam allowance. Finish the seams with a serger or zig zag stitch.

Turn your bag right side out.
Find the middle of one side of the bag. Pin your strap about 3.5 inches from the middle on each side. The raw edges of the straps should line up with the raw edge of the bag and the strap should be pointing down. Baste the strap in place. Repeat with the other strap.
Hem the top of the bag by folding the top edge down ½ inch then another 1 inch press and pin in place. The straps will be down inside the bag. If you are adding a pocket, tuck the raw edge of the pocket into the hem between the straps on one side. Sew along the folded edge to hem the bag and secure the pocket.
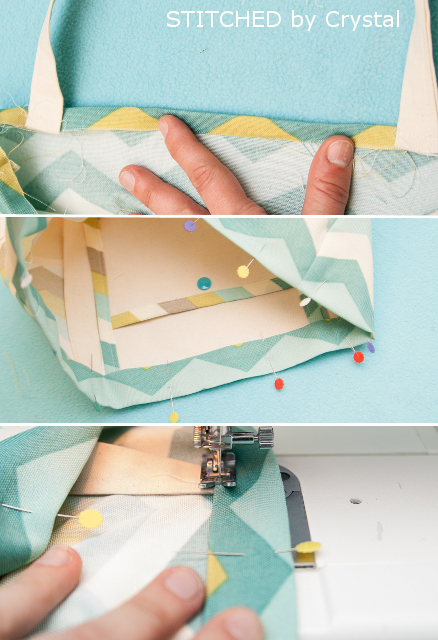
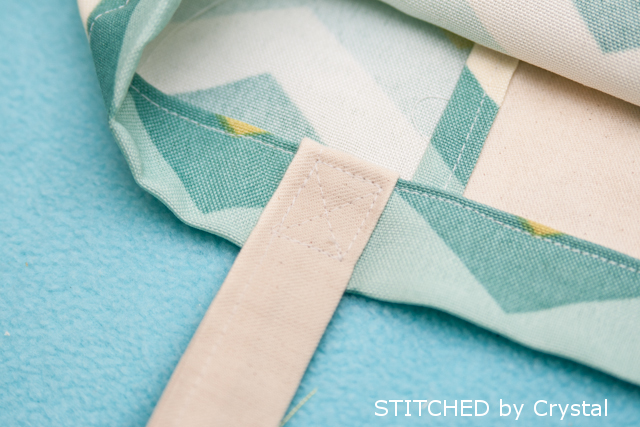
Flip your straps up and secure them with a box stitch (a box with an X inside it)
Your bag is done!
I have always wondered how to do that!
ReplyDeleteFantastic, omg
ReplyDeleteIt's a nice article, Which you have shared here about the woman bag. Your article is very useful for those who are looking to buy woman handbags. I would like to thanks for sharing this post here. buy women handbags online
ReplyDeleteI am impressed by the details that you have shared in this post and It reveals how nicely you understand this subject. This information is meaningful and magnificent which you have shared here. I would like to thanks for sharing this article here. meal prep bags australia.
ReplyDeleteERP for Furniture Manufacturing; Maximize your organization’s productivity with ERP for furniture manufacturing. From strategy and planning to cost management, we’ve got you covered.erp for furniture manufacturing
ReplyDeleteYour clear instructions and helpful tips made the process so much easier to follow, and I'm thrilled with the finished product. I never thought I could create something so beautiful, but your contexto guidance and expertise really made it possible.
ReplyDeleteAmong Us - Crewmates are tasked with completing various tasks around the spaceship, such as fixing wiring, fueling engines, or downloading data.
ReplyDeleteThis comment has been removed by the author.
ReplyDeleteThe bag is very simple to make but it also looks very beautiful and Mapquest Directions convenient.
ReplyDeletePerfect for the beach, pool, or running errands MapQuest Route Planner around town, this tote is a stylish addition to your accessory collection.
ReplyDeletePlayers face traps, riddles, and opponents in level devil 2 , a platform game. It trains players' reflexes and strategic thinking. Play now and complete all the difficult levels.
ReplyDeleteA great casual game that becomes addictive the more you play. The constant challenge of avoiding spikes Tap Road and making those quick lane changes keeps me on my toes.
ReplyDeleteTutorial: Colorblock Tote is beautiful and trendy. I love to use these ideas and make such trendy tote. To see how it works when I used Greater Brisbane leaking roof I got the best solutions. You are good to have it and it provides us with the right solutions.
ReplyDeleteThis 16x16 inch bag needs durable fabric like canvas. Cut rectangles as instructed, then sew the optional pocket for your keys. Straps next! Feel like you're speeding through a challenge? This bag is like mastering Slope Game - once you get the hang of it, it's incredibly rewarding. Perfect for summer or errands!
ReplyDelete