
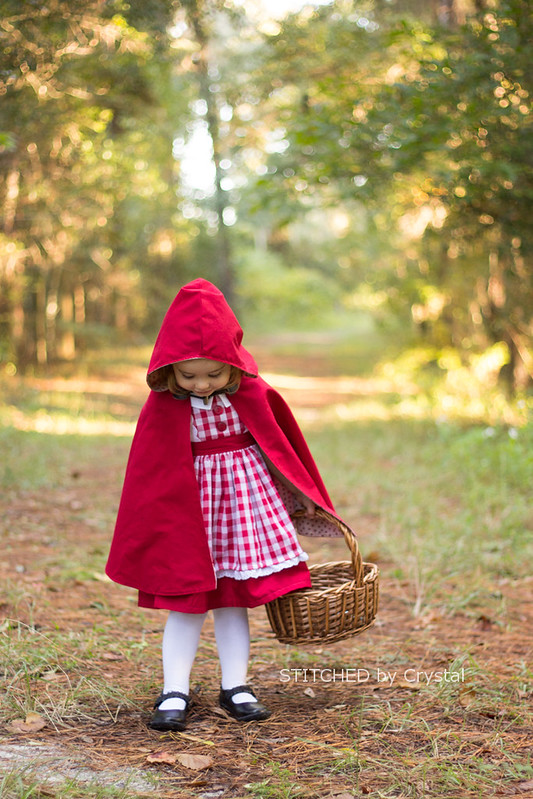
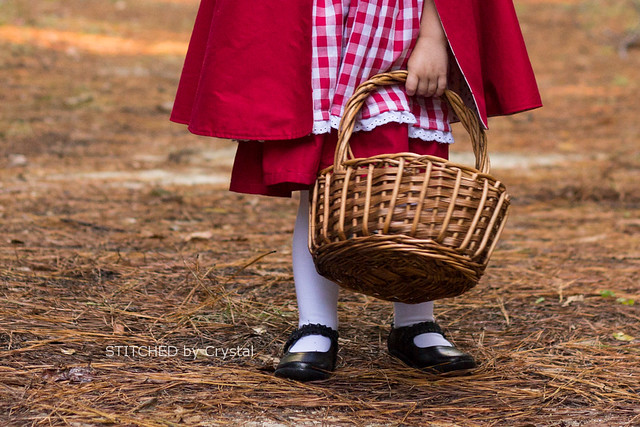
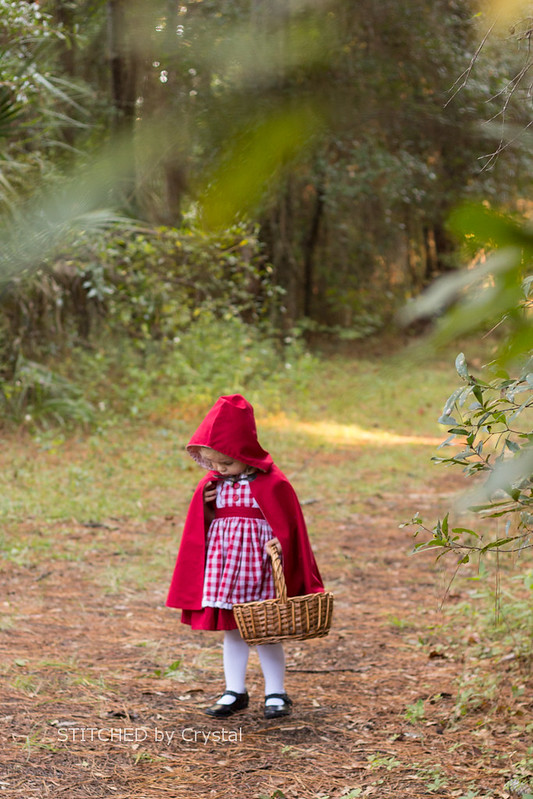
For her costume, I made her THIS gingham dress. I felt like a Little Red Riding Hood costume gave me the freedom to make any dress I wanted really, there are so many different variations of Little red, ones that wear red dresses, ones that wear black corsets, ones that wear grey dresses...So really she just needs a dress and a red hooded cape. I chose to do a gingham with some eyelet trim and I love love how it turned out.

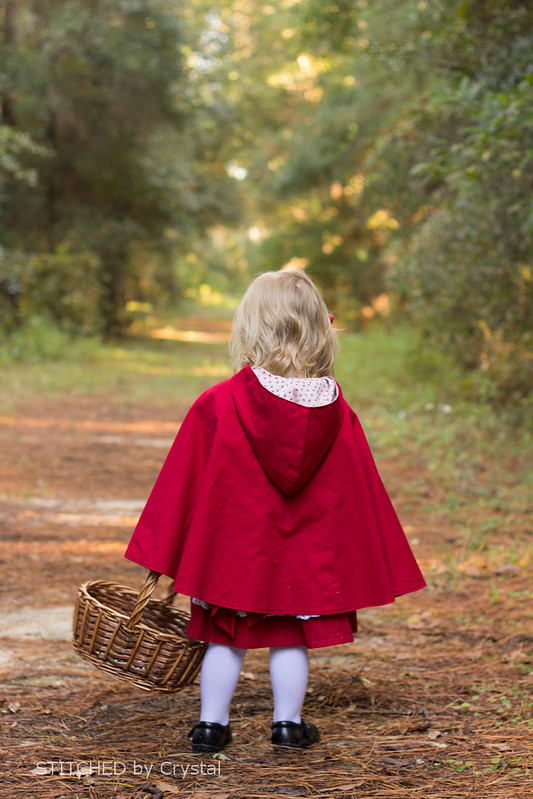
Then I made her cape. It is red (of course) on the outside and I lined with a vintage looking fabric that is cream colored with little red flowers. And finished it off with a little toggle to keep it on. More details on how I made the cape are at the end of this post!
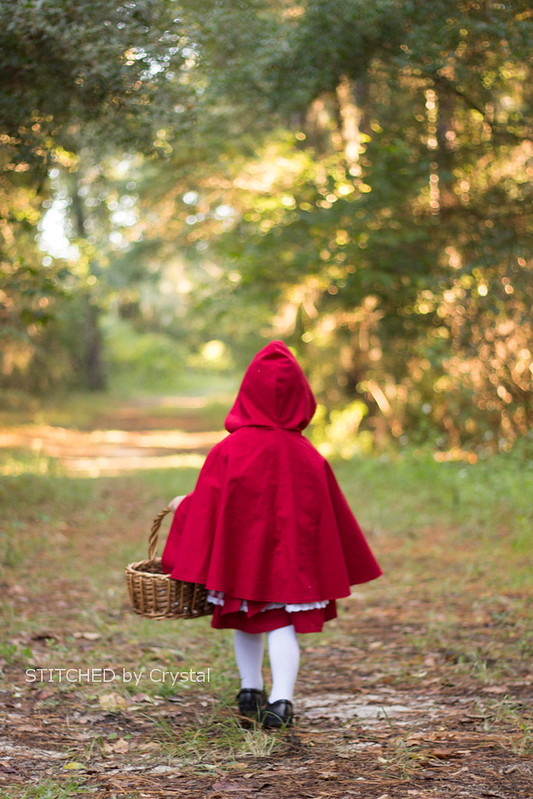
And to finish off her costume, I picked up a basket at Hobby Lobby for Little Red to carry all her goodies for Granny (or her candy for trick-or-treating).
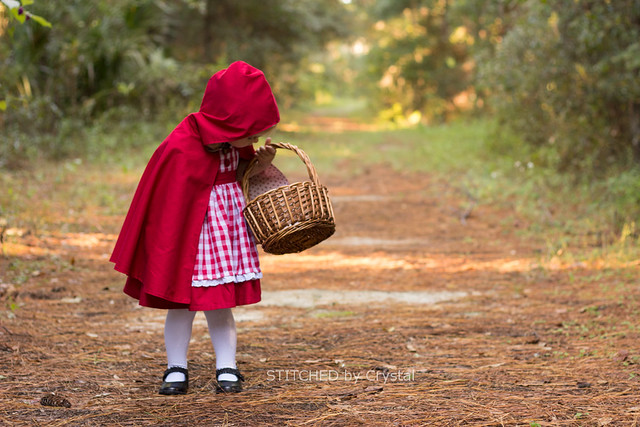
And Little Red Riding Hood is ready to head off into the forest alone to take some goodies to her poor sick Granny....OK wait, who sends their kid off into a forest alone where she could get eaten by a wolf?! I think we will be sticking to supervised trick-or-treating in a wolf free zone:) Although, A has informed me that I shoud dress at the wicked wolf, and he says that I have to wear a costume if I want to go trick-or-treating with him...we'll see.
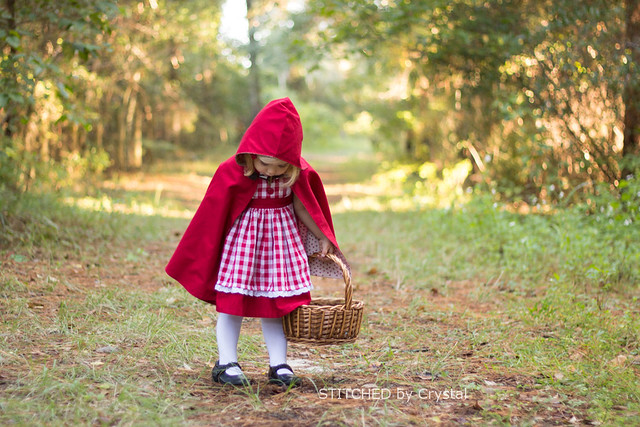
Alright, one more photo of my adorable Little Red and I will get on to the cape tutorial!
Want to make a hooded cape? Here is how I made mine!
You will need:
- Fabric for the outside of the cape, red if you are making little red but this cape could be used for lots of costumes...Like a vampire, Harry Potter, you could even modify it a bit to make a Frozen Anna cape. As far as how much you need, that depends on the size you want to make, I used 1 1/4 yard for my 2 year old
- Fabric for the lining, the same amount as the outer fabric
- Something to fasten the cape, I used a toggle, but you could use something like a ribbon to tie or a button and fabric or elastic loop.
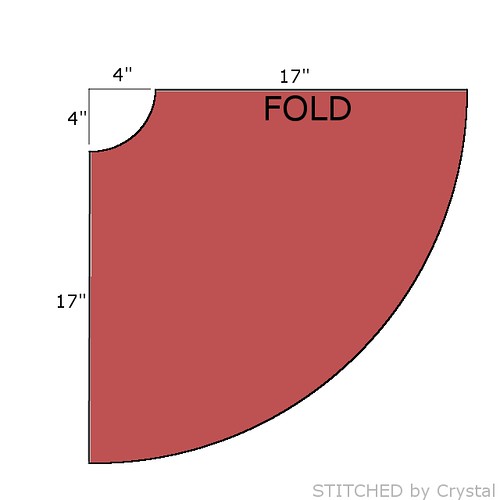
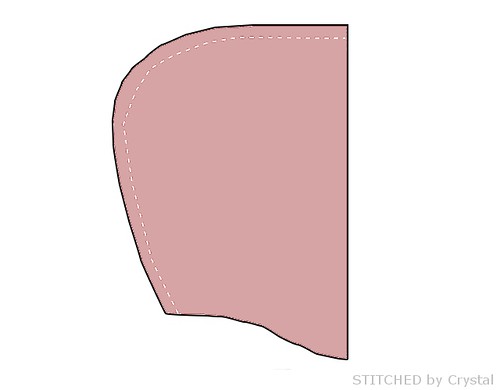
The cape is made from a big half circle. Determine the what the finished length you want your cape and then add 1", for my daughter the finished cape is 16" so I cut my cape 17" long. Fold your fabric in half, then cut a quarter circle on the fold (when you unfold it it will be a half circle). Cut a quarter circle with a radius of 4" at the top, then cut a second circle measuring the finished length +1" from the first circle as shown in the photo below. You will need one of these in your outer fabric and one in your lining. The 4" radius at the top should work for most small kids, for bigger kids or adults, you may want to go up to 5".
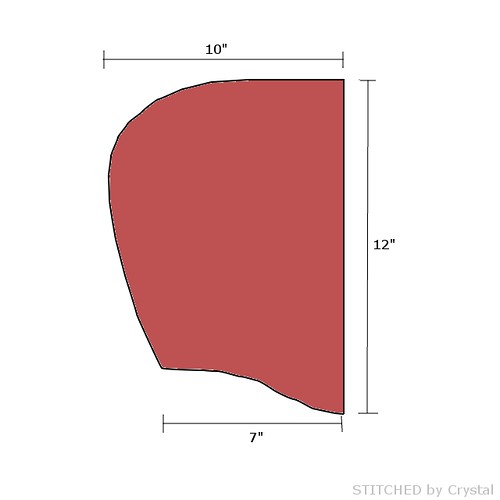
To cut the hood, I drew out a hood shape that was roughly 10" wide and 12" tall. You can see the shape I cut below. Again, this size works for my 2 year old, you will want to adjust for bigger sizes. An easy way to get a good hood size and shape is to trace a hood off of one of your kids sweatshirts that fit well, simply lay the hood flat and draw around it. You will need 2 hood pieces for the outer cape and 2 hood pieces for the lining.
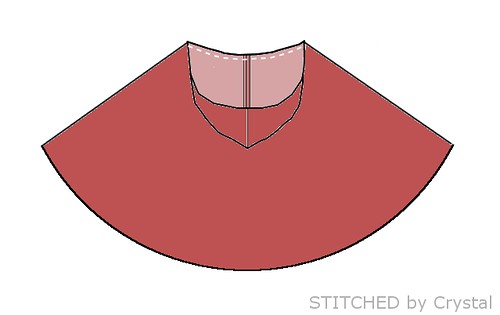
Sew your hood pieces right sides together as shown below. Repeat with the lining hood pieces.
Open your hood and pin the bottom of the hood to the neck hole of the cape with the right sides of the hood and cape together. Sew the hood to the cape, repeat with the lining.
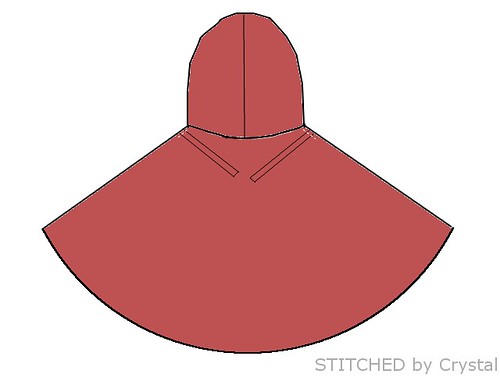
If you are using ribbon or a button loop as your closure, baste them in place now. Baste them to the right side of the cape lined up with the raw edge of the cape, close to the hood.
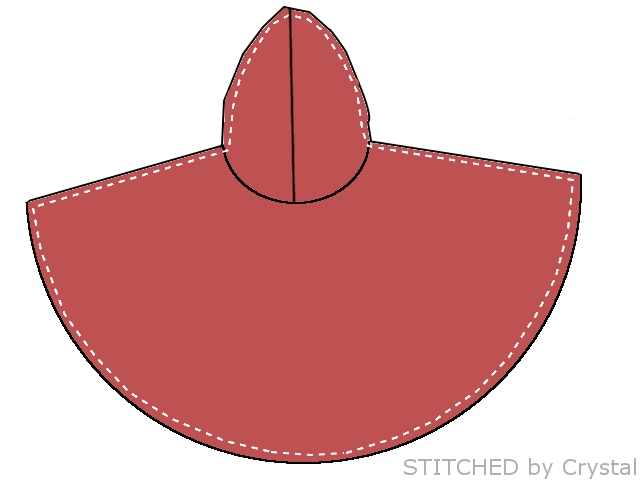
Place your cape and the lining right sides together and sew all the way around the edge, leave a 3" opening at the bottom of the cape.

Turn the cape through the hole left in the bottom. Press the cape, then topstitch around the edge of the cape and hood, making sure you close up the hole at the bottom.
If you are using a toggle, sew it in place now. And your cape is done! Easy right?!
Adorable! I've got a Craft Gossip post scheduled for this evening that links to your tutorial:
ReplyDeletehttp://sewing.craftgossip.com/tutorial-little-red-riding-hood-cape-for-little-girls/2014/10/22/
--Anne
I am new at sewing...could you explain your second circle cut in the cape ii just think I'm brain dead or something I just can't get it..thanks
ReplyDeleteI know this is 2 years too late but this instruction confused me for ages too. Forget about cutting a 'second circle' - you have already cut it! But thanks so much to the author of this really helpful tutorial. I followed it last night and my daughter is now at school dressed as Little Red Riding Hood. She looks great. :-)
DeleteWhat type of red fabric did you use for this project?
ReplyDeleteThis is adorable. Thanks for sharing, this is just what I was looking for.
ReplyDeleteThank you! quick and easy to make - makes one happy mummy and one happy 3 year old!
ReplyDeleteThe protagonist of the story, a sweet and innocent girl who wears a red hooded cloak. She is tasked with delivering food to her grandmother's house. basketball star
DeleteI know you posted this last Halloween but I found it while searching pinterest this year. I just wanted you to know that I made the cape for my 2 1/2 year old daughter's Little Red Riding Hood costume and it's adorable! Your directions were simple to follow, and it was very easy to put together. Thank you so much for this! :)
ReplyDeleteLove the cape, your daughter looks so cute in it! So clean and simple, but the toggle really finishes it off nicely. Beautiful photo shoot too, that wooded path is perfect :)
ReplyDeleteThis is so cute - thank you for sharing your tutorial. I've just made one for my toddler for a traditional dress up event called Carnival in Germany. I opted for a button and ribbon closure and as the lining I had was so pretty I made it reversible.
ReplyDeleteJust whipped this up for world book day for my 3 year old, fabulous tutorial, thank you!
ReplyDeleteJust whipped this up for world book day for my 3 year old, fabulous tutorial, thank you!
ReplyDeleteThank you so much! This is just what I needed.
ReplyDeleteI made one as a gift, it came out great! I'm new at sewing :) Now I'm going to make one for my son too.
ReplyDeleteA cunning and deceptive character who tricks Little Red Riding Hood into revealing the location of her grandmother's house. In some versions of the story, the wolf also disguises himself as Little Red Riding Hood's grandmother. brutto netto rechner
DeleteThis is SO cute! Great tutorial, easy to understand instructions. Thank you!
ReplyDeleteThanks so much for the great turorial!!! I made this smaller for my 9 month old in velvet and its adorable!!!
ReplyDeleteThis comment has been removed by the author.
ReplyDeleteThis comment has been removed by the author.
ReplyDeleteYou are looking very pretty in this red hooded dress. This is very beautiful and perfectly suit you. If you are interested to buy Toddler Dress Coat at the affordable price, Visit lazosycaprichos.com
ReplyDeleteBusiness users may choose the product according to their business level. Other product by the antivirus is for different categories and users across the world rely on it to secure their data.For More information Visit Our Site:
ReplyDeleteoffice.com/setup norton.com/setup norton.com/setup
Thanks for sharing this quality information with us. I really enjoyed reading. Visit to my blog Web Judi Online Terpercaya
ReplyDeleteby having expertise in the field of online gambling
manual testing tutorial
http://makeland.link/higaming/
https://daora2.com/
https://daora3.com/
https://bet365kor1.com/bet365kor/
https://bet365kor1.com/
https://ocn2001.com/
Awesome information! I as of late ran over your online journal and have been perusing along. I thought I would leave my first remark. I don't recognize what to say with the exception of that I have. Astro World merchandise
ReplyDeleteMuch obliged for sharing the data, keep doing awesome... I truly delighted in investigating your site. great asset... https://kanyewestmerch.net/hoodie/
ReplyDeleteSuperb article, a debt of gratitude is in order for assembling this! This is clearly one awesome post. Much obliged for the profitable data and bits of knowledge you have so given here. https://criticalrolemerch.com/product-category/hoodies/
ReplyDeleteThank you for your well written and well explained post. I am a total beginner and found this so easy to do. And the end result is so cute!
ReplyDeleteIF you want to have multiple interfaces with several systems, the API platform of Brixxs is really suitable Shopify api
ReplyDeleteNice Blog. Thanks for sharing with us. Such amazing information.
ReplyDeleteCAN REWRITING OLD CONTENT IMPROVE WEBSITE RANKING?
Facts About where to buy sex dolls Revealed https://www.uusexdoll.com/full-body-sex-dolls/
ReplyDeleteUK based online adult superstore
ReplyDeleteCheap Dildos
Pocket Pussy
Anal toys
Mens Sex Toys
Black dildo
Monster Dildos
That's such a delightful retro bowl costume idea! Little Red Riding Hood always brings such charm to Halloween.
ReplyDeleteThis tutorial is incredibly adorable! The instructions are clear and easy to follow. Many thanks for providing such a great and cute guide!
ReplyDeleteISO 9001 Lead Auditor Training
Love the Little Red Riding Hood costume! The gingham dress is adorable, and that red hooded cape is the perfect finishing touch! Thanks for sharing the tutorial too; might try it for a Frozen Anna cape! unscramble words
ReplyDeleteI love how you made your daughter's Little Red Riding Hood That's Not My Neighbor costume! You made it so special and cute that it will definitely create some memorable Halloween memories for the whole family. Thanks for sharing how to make the cape and the tutorial!
ReplyDeleteNeal Fun games offer an exhilarating escape into a world of fun and excitement! With a diverse range of games to choose from, boredom is simply not an option. From brain-teasing puzzles to adrenaline-pumping adventures, there's something for everyone here. Dive into the action and let the fun begin!
ReplyDeleteThis comment has been removed by the author.
ReplyDeleteIf you’re a fan of puzzle games, you should definitely check out cupcake 2048. It offers a fun twist on the classic 2048 gameplay, making it a delightful experience for players of all ages!
ReplyDeleteIf you're a fan of both Taylor Swift and puzzle games, you have to try 2048 Taylor Swift! It's a fun twist on the classic 2048 game featuring Taylor's music and iconic moments.
ReplyDeleteYour blog posts are always so encouraging! This one provided me with practical tips to stay motivated and focused. Thank you for your thoughtful advice. Your words inspire readers to take bold steps and believe in their potential. Keep writing—Brightrs you’re making a profound impact on so many lives striving for personal success!
ReplyDeleteIt's funny that some people still believe that gnomes are witchcraft or demonic, while they are just little guys from fairytales! :)
ReplyDeleteI love the hooded cape tutorial for Halloween costumes! It reminds me of fun games like quebra-blocos jogo where you can play offline and enjoy strategic challenges.
ReplyDeleteAbsolutely adorable and beautifully made—this hooded cape tutorial for Little Red Riding Hood is clear, creative, and perfect for making a memorable costume with love and style.heictopdf
ReplyDeleteLittle Red Riding Hood is such a perfect choice, and a cape tutorial sounds amazing! Halloween sewing truly is the best. It's so fun to get creative. Speaking of fun, if you're ever looking for a cool game site to unwind with, you should totally check out purble place online.
ReplyDeleteSounds like a charming project — a hooded cape inspired by Little Red Riding Hood is nostalgic, whimsical, and so fun to wear (or craft!) — love the idea.Minute Cryptic
ReplyDeleteLittle Red Riding Hood! That sounds absolutely adorable, and a cape tutorial is perfect for Halloween. Em is going to look amazing! Speaking of fun, sometimes after a big sewing project, I like to unwind with a quick game, maybe even some drive mad!
ReplyDeleteWow, the gingham dress and red cape combo for Little Red Riding Hood looks adorable! I was skimming this tutorial while sipping my morning coffee, and the whole custom costume idea for Halloween is just fantastic. Also, who knew you could make something so cool with SBTI online advice?
ReplyDeleteExplore the latest collection of gowns for girls, ideal for parties and weddings. Shop beautiful Girls gown designs to make her special day . gowns for girls
ReplyDeleteI love how Crystal picked a Little Red Riding Hood costume and even made a cute gingham dress by herself! Her attention to detail is amazing, especially with the vintage fabric lining for the cape. Honestly, it made me think of those Chinese practice for beginners language learners who put in so much effort to get things just right. I stumbled upon this during my coffee break and got inspired – perhaps it's time to sew something myself!
ReplyDeleteDiscover elegant wedding dress for girls perfect for festive celebrations. Buy wedding dresses for girls online in India at the best price today. wedding dress for girls
ReplyDeleteThis cape tutorial is so cute! I love how you made the hooded costume. It reminds me of using Random Pair Generator to pair up kids for group activities in my classroom.
ReplyDeleteShop trendy kids wedding dress at Ministitch. Shop stylish outfits for boys and girls including gowns, suits, frocks & festive wear online. kids wedding dress
ReplyDeleteIn digital communication, using the correct Enye letter improves clarity and professionalism. Emails, academic papers, websites, and business documents benefit from accurate spelling because every character matters. Including Ñ where required ensures that names and words remain authentic while preventing misunderstandings caused by incorrect substitutions. https://enyesmallbig.com/about-us/
ReplyDeleteThe Enye is widely recognized as a symbol of Spanish language and culture. It represents more than pronunciation—it reflects centuries of literary tradition, education, and national identity. Seeing Ñ in books, newspapers, and online content reminds readers of its lasting importance in preserving linguistic heritage across generations. https://enyesmallbig.com/about-us/
ReplyDeleteThis comment has been removed by the author.
ReplyDelete